Waves: Adapting Papercut Style for Embroidery
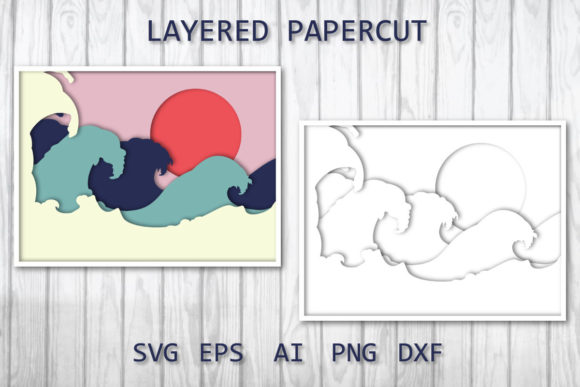
As a designer who constantly bridges the gap between digital assets and tangible textiles, I approach every new file with a specific question: will this actually stitch out well? When I first opened the Waves package, my immediate reaction was appreciation for the aesthetic. The Japanese-style papercut influence is undeniable, offering a serene, rhythmic flow that feels both traditional and modern. However, as an embroidery professional evaluating this for real-world application, my mind immediately shifted from visual appreciation to technical translation. This asset is marketed as a layered papercut template for shadow boxes and 3D SVG projects, but its potential for machine embroidery design is significant if approached with the right strategy.
The mood of Waves is distinct. It carries a sense of movement and organic layering that is often difficult to achieve in digitizing without creating excessive bulk. For those of us running a craft business or managing an Etsy shop, this design offers a sophisticated alternative to standard nautical themes. It does not look like clip art; it looks like intentional art. Whether you are planning a custom apparel line or a personalized gift, the visual personality here suggests high value and artisanal quality, which is exactly what buyers are currently seeking in handmade products.
Translating Paper Layers to Thread and Fabric
In its native format, Waves relies on physical depth created by stacking paper. In embroidery, we must simulate this depth through stitch density and thread colors rather than physical spacers. As I reviewed the EPS and AI files included in the colored layers folder, I began mentally mapping how these vector shapes would convert into satin stitch borders and fill stitch interiors. The beauty of a papercut style lies in the negative space and the clean edges. For an embroidery project, this means your digitizing or conversion process must prioritize crisp boundaries.
If you are using this as an applique design, the layered nature of Waves is a massive advantage. Each "wave" can be treated as a separate fabric piece, secured with a running stitch and finished with a tight satin border. This mimics the original paper cut aesthetic while adding textile warmth. For commercial embroidery projects, such as boutique branding or small shop merchandise, this technique elevates the perceived value of the item. A flat print cannot compete with the tactile reality of layered fabric waves catching the light. However, because the source files are vectors intended for cutting machines, you must verify that your embroidery software interprets the curves correctly before committing to a final stitch out.
Real-World Application: The Canvas Tote Test
To truly evaluate Waves, I considered a specific scenario: a premium canvas tote bag intended for a summer capsule collection. Tote bags are a staple for Etsy sellers and makers, but they require designs that hold up against wear and washing. The Japanese wave motif fits perfectly here, evoking coastal travel and mindfulness. In this context, I envision using unbleached canvas as the base, with indigo and cream threads to honor the traditional color palette while ensuring high contrast.
For this tote bag design, stability is paramount. Canvas has a pronounced fabric texture that can distort delicate lines. I would recommend testing the design on scrap fabric first, specifically using a medium-weight cutaway stabilizer to prevent the hoop size tension from warping the wave crests. The goal is to maintain the fluidity of the Waves design without the stiffness that comes from over-stabilizing. If executed well, this becomes more than just a bag; it becomes a wearable piece of art that justifies a higher price point in your shop. Customers respond to this level of intentionality. They aren't just buying a utility item; they are buying a finished product that reflects cultural appreciation and design competence.
Navigating Technical Constraints and Fabric Choices
While Waves is versatile, it demands respect for technical limitations. The intricate curves inherent in Japanese papercut styles can be unforgiving on certain materials. I would advise extreme caution when attempting this design on stretchy fabrics like jersey knits or thin performance wear unless you are highly experienced with stabilization. The density required to create clean edges on a wave shape can cause puckering on unstable grounds. Similarly, dark fabrics present a challenge; the layered effect relies on shadow and contrast. On black or navy material, you may lose the definition between layers unless you use metallic or high-sheen thread colors to create artificial separation.
Small hoop sizes also warrant a warning. Reducing a complex, flowing design like Waves to fit a 4x4 hoop risks losing the very essence of the movement. Tiny details in the wave crests may turn into mud if scaled down too aggressively. Always inspect small details at actual size in your software before stitching. Furthermore, consider the end use. If this is for baby embroidery or items requiring frequent washing, ensure your stitch density is balanced. Too dense, and the garment becomes stiff and uncomfortable; too sparse, and the fabric shows through, breaking the illusion of the solid wave form. For nursery decor or pillow covers, you have more freedom with density, allowing for a richer, more plush texture that enhances the cozy atmosphere.
Professional Standards for Makers and Sellers
For creative entrepreneurs and digital product sellers, maintaining brand consistency is key. Waves offers a cohesive theme that can span multiple product categories, from embroidered patches to holiday embroidery gifts. However, professionalism extends beyond aesthetics. Before listing any item featuring this design, confirm your licensing. The ZIP includes two folders with colored layers, EPS, and AI files, but usage rights for commercial sale of finished goods versus digital redistribution vary. Never assume. Protect your business by verifying terms directly.
I also strongly recommend creating printable mockups before investing hours in sampling. Test the design in black and white mockups to judge value contrast independent of color. Compare how it looks on light versus dark backgrounds digitally. This saves time and thread. When you do move to physical sampling, treat it as R&D. Check whether the design works for both personal and commercial projects by making samples at different scales. Does it work as a subtle pocket logo on a sweatshirt embroidery project? Does it command attention as a large back piece on a denim jacket?
Finally, remember that your customers trust your judgment. When you sell a handmade product featuring Waves, you are vouching for its durability and beauty. Inspect your test runs critically. Are the registration marks aligning perfectly between layers? Is the satin stitch covering the raw edges of the applique completely? These microscopic details define the difference between a hobbyist attempt and a professional-grade asset. By treating this papercut template with the rigorous standards of textile manufacturing, you transform a digital file into a lasting, sellable treasure that resonates with buyers looking for authentic, thoughtfully crafted goods.